
Easy rope necklace
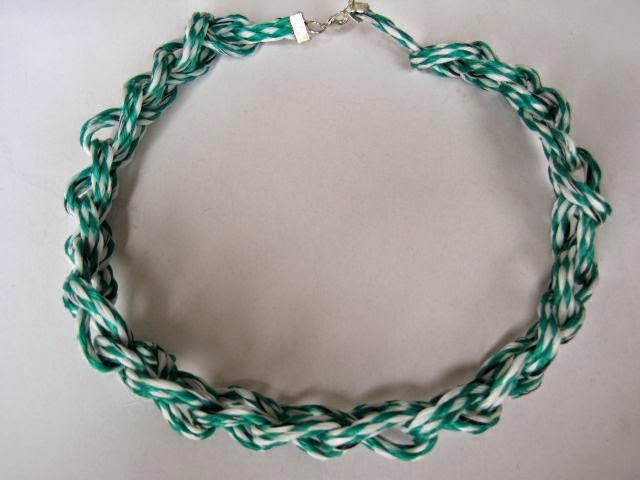 |
| Rope Necklace |
The gist of this blog, first and foremost, is to try and make clothes and accessories out of old stuff. Next best is to make or DIY. Buying vintage, retro or second-hand is also great.The very last course of action is to buy. You don’t need to buy when you can DIY so may things. Read – here – for reasons to avoid buying.
This blog will never be about showing off bought items. When I style my model, the outfits consist of as much DIY, second-hand or vintage clothing and accessories as possible. At the end of this post you will find links to eco friendly outfits I’ve put together.
I cannot lie, I fall in love with items of clothing all the time, and I do succumb to indulging my desire to have lovely, wearable things. Some clothes and accessories are not easy to make – like shoes. But each time I DIY instead of buying I know I am reducing my footprint on this earth, even if it’s only a teeny little bit.
 |
| Make a chain |
Moving on to this week’s DIY idea.
My husband had a big pile of rope lying around. This particular piece he uses for tying things to the roof-racks of his car. It’s made of plastic, is quite thick but it’s also incredibly light. It was a long piece of rope so I asked my husband if I could have just a little. He was happy for me to snip just over a metre.
Initially I wanted to make a bracelet but the rope was a bit too thick. Instead I made this necklace. At first I thought of plaiting it or twisting it. Then it occurred to me that I could do a plain and simple crochet chain stitch with my fingers. Here’s how – how to do chain stitch.
To make this necklace you need: –
around 1.2 meters of rope
O-rings {also called jump rings}
pliers
clasp
 |
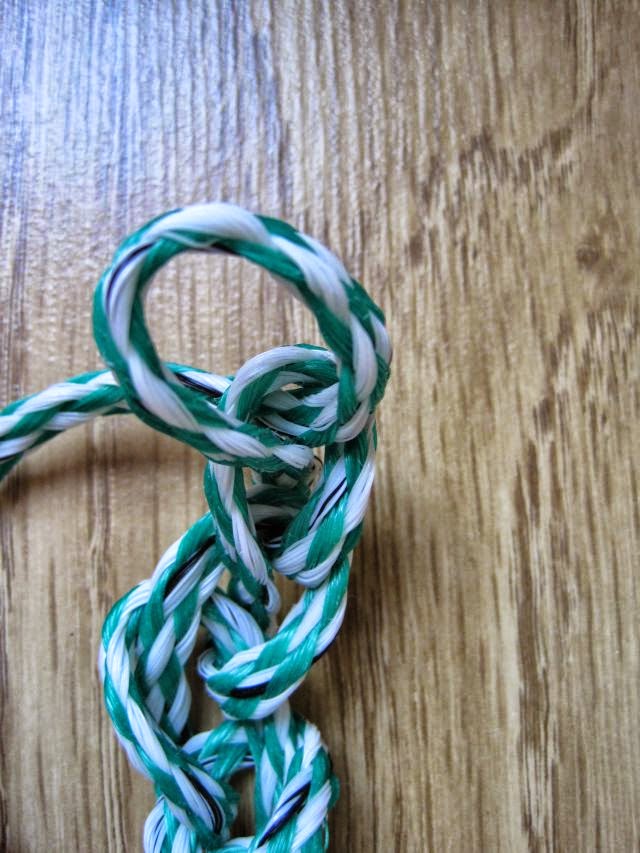
| cord ends |
2 x cord ends
2 part adhesive
lighter
scissors
You do: –
- Begin by making a chain with your fingers as per the link above.
- Hold the necklace to your neck and cut the ends where you are happy for the necklace to fall.
- Using a lighter, carefully melt the ends of the rope.
- Attach the cord ends and then the O-ring and clasp.
- Secure the last loop of the chain as well as the cord ends with a drop of two part adhesive.
- One last thing. The rope was a bit crinkly from being tied up, so I wrapped it around our kettle and clipped it in place with a peg. The heat and the round shape of the kettle removed the kinks.
For a similar rope necklace visit – this post – and to see a necklace made from curtain tie-backs visit – this blog. My mother got creative with curtain tie backs – here.
For more ideas to upcycle and recycle visit the Greenie Galleries at the top of this page.
You can share your DIY projects or like the Greenie on the Greenie Dresses for Less facebook page.
Here are some green clothing combinations I spoke of earlier in this post. Number 1, number 2, number 3, number 4, number 5, number 6, number 7, number 8, number 9, number 10, number 11, number 12, number 13, number 14
Lovely necklace.
Thank you.