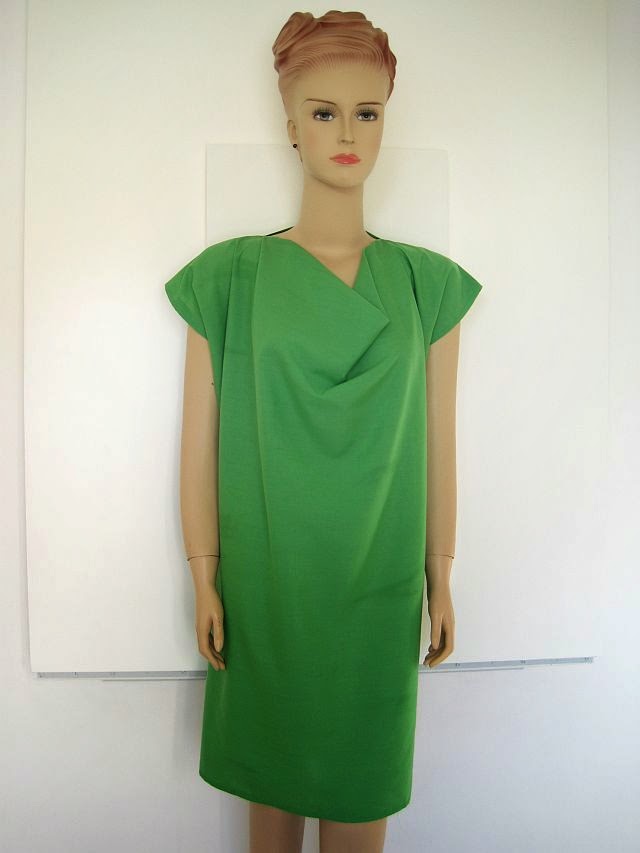
Folded Neckline Dress
The inspiration for this dress came from a black red ombre Diesel shift I saw in a fashion magazine.
 |
| Origami dress |
Edun also do
a similar dress in a check print.
I was wary to try and make my own pattern, but luckily it worked well.
The first thing I must mention is this will NOT work if your fabric is too soft or a knit. You will get a draped effect or a cowl neck and not the folded origami neckline.
 |
| Sew shoulders and sides |
I used a light cotton. You could go for a heavier fabric but then know that the fold will become more pronounced. Which is kind of the point of this shift dress.
 |
| Fold and hem neck |
The pattern is straight forward. A rectangular piece for the back. The same for the front, but the top is widened to allow the fabric to drop at the neckline.
I am a UK dress size 10. You could use my pattern, or make your own pattern bigger or smaller to fit your size.
 |
| Origami dress pattern |
Just remember when making a pattern to allow for seams. My pattern includes a 1.5 centimetre seam allowance.
You need: –
scissors
pins
sewing machine
fabric
matching colour thread
 |
| Sewing neck hem |
You do: –
Cut your dress from your fabric. Lay the front piece on top of the back. Pin your sides and shoulders together.
Sew sides leaving space for your arms to slip through.
 |
| Fold arm area |
Sew the shoulders leaving space for your head to slide out.
Fit your dress and check you are happy with the fit. You can always let out or take in seams at this point. I wanted this particular dress to be a bit roomy.
If the arms or neck are too tight, unpick a few stitches. Likewise if they are gaping, sew a bit more to get the right fit.
Fold over edges around arms and neck and press your dress with an iron taking care not to burn yourself or fabric.
Try on your dress again and check in a mirror where you want the hem line to be. Pin the hem in place and cut away any surplus fabric.
Hem armholes, neck and hemline.
 |
| Hem arms |
Press dress again and you’re done!
If you don’t like the capped sleeve then fold over more fabric which will give you a smaller piece at the shoulder.
Visit the Greenie Galleries at the top of this page to see older DIYs. I’ve shared myriad fashion upgrades from FREE sewing patterns to tutorials for making jewelry from food packaging.
As always, I try to up-cycle or recycle.
I will be back with more next week,
Greenie.

I would love more of a pattern/formula for this dress. I tried adapting from what you have, but I’m far from a size 10 (40 years ago, maybe) and while I’m an adequate quilter, I have had little success with garment construction. I know how to convert to inches ;-0, but getting the basic formula would be a big help. Thanks so much, and thanks for having such a great site.
Hi Leslie
Thanks for your comment. Unfortunately I don’t know anything about pattern making.
So am unable to give advice. I’m sorry about this.
I show my patterns more as a guide to what the pattern should look like.
Nothing I make is fitted or tailored so most things I make will fit people a size or two up or down from me.
There are a few sites on-line that give free advice for sizing. Good luck.
Greenie.
thanks for responding so quickly – well, I’ll give it a go anyway using the old sheet method. My old sheets aren’t as nice as your old sheets, so they won’t result in anything worth wearing, but it will help me know if I’ve hit the mark before I cut any fabric I like. Thanks again.
Try the v neck shift dress first. I’ve had a few comments from novice dress makers who made that dress.
It’s my favorite dress to wear.
And the easiest to make.
Hi, I am a plus sized lady and was able to scale up the pattern by using my own body measurements. On a calculator you can scale up the pattern given here once you know your own width and height. I also checked these against a coat I wear to be double-sure. The dress turned out wonderfully and is lovely design for summer. Many thanks for this funky design.
So pleased to hear that. Thank you for your comment.