
How to sew this easy T shaped top
 |
| Tee Top |
I saw this most amazing top in Zara week before last and I had to try and make it. It’s so simple, and making the pattern wasn’t too arduous either? I don’t like making patterns. I have made too many mistakes in the past. It’s cheaper and easier to just buy them.
A word on fabric. Usually you need to be careful with your fabric choice as the weight and density will affect the fit. I made this top in muslin but I suspect, and will be trying, that you can use heavier fabrics.
This pattern lends itself to the sheer loose summer tops that are hot right now.
To make this pattern you need: –
- a T-Shirt
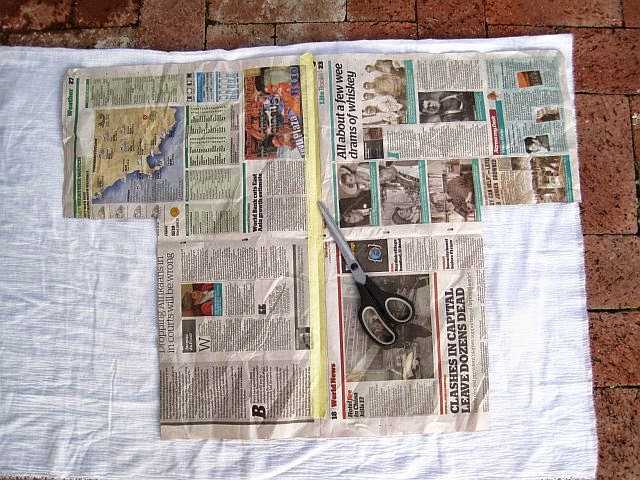
- a big piece of newspaper
- a black koki pen
- paper scissors
Trace a chunky T shape around your top. See the pic for guidance.
What you must remember is that T-Shirts are made of rib knit which stretches to fit your body, so you have to be generous with the outline that you create or you will never
 |
| How to cut the pattern |
get into this top.
Also remember to allow a 1.5 centimetre seam allowance around the outside of your pattern.
Lastly make sure your pattern is symmetrical. Fold it in half and check both sides are exactly
 |
| Using your pattern cut the top |
the same.
To make the top you need: –
- fabric
- sewing machine
- sewing scissors
- pins
- matching colour thread
You do: –
You need two matching pieces, a front and a back, so fold the fabric in half before you cut. Pin your new pattern to your fabric and cut out your top.
I never edge stitch unless I am using fabric like satin, but this is the time to edge stitch if you fear the edges will fray.
Start by sewing the sides and underarms together on both sides.
 |
| Sew sides and underarms and top sleeves |
Next, pin the top side of the sleeves and allow a space in the middle for your head to fit. See the pic for guidance.
Now, you need to sew a hem in the neck area, the edges of the sleeves and on the lower edge of the garment.
Before you do that, try it on to make sure you are happy with the fit and check how long you want the top to be. Finish hems and then iron.
You could leave the hems raw for a more rustic
 |
| The ZARA top – source Zara.com |
finish, or even wear it inside out for an even more rustic take. See another version of this top made from old curtains – DIY Kimono top.
And that’s it! Thanks Zara for the inspiration.
Plenty more ideas like this one on the Greenie Galleries. Find them at the top of this page.
See you next week.
Greenie
this post really good. i really gonna try this but before that what kind of fabric you use on this project? so i can buy the same fabric with yours…
I used a cotton.
Fantástico!
Fácil y muy bonito.
Fantastic idea!
Easy and very pretty.
I don’t see a picture of Your finished product? :/
I’m sorry Holly. There is definitley a pcture of the top.
Great tutorial! Can I use chiffon??
Not sure to be honest. Chiffon is not easy to work with. It frays a lot.
Sorry I can’t be more helpful than that.
Greenie.
Hi, I want to make this but I’m not sure how the neck is cut. Does it have a curve in the neckline or is it basically a slit in the middle? Thank you. I look forward to your reply. 🙂
Hi Tonya
There is no curve in the neck on this top. But I would suggest adding a slight curve as it sits high on the neck.
Hope that helps.
Greenie.
Thank you very much for your kindly.
Kanya
I am so excited to try this! I am going to make matching tops for my girls and me!
Glad to hear. Super easy pattern.
All the best,
Greenie.
Loved this easy to make top. Perfect for staying cool on a hot day! I didn’t finish the sleeve edges or the bottom because my fabric has a natural fringe and it really looks great.
So pleased to hear Beth.
LOVE the idea of a raw hem.
All the best,
Greenie.
were do you buy the fabric? and were did you by your mannequin be cuss i can not find one.love your website
Hi Anna
We have a few fabric shops in Woodstock, here in Cape Town, South Africa. I usually shop there. The mannequin I found on Gumtree. I guess it’s a similar site to Craiglist. I must say, she’s a weird shape. Her hips are tiny. Her bust is huge and high on her chest. Her head is enormous and her hands minuscule. Would love a more realstic model, but I’ve gotten used to this one.
All the best,
Greenie.
I love the higher neck! I’m getting ready to rock into my 6th decade and trust me…nothing ages pretty! I am also going to make this knee length for a linen summer dress. It will be ready for the weekend!
Let me know how it goes with a longer length Cynthia. You can post a pic on the Greenie Facebook page.
All the best.
Greenie.
Thank you!!!
Just discovered your site. I ditto Cynthia above. Think I’ll try this pattern. Your instructions read ‘for the simple seamstress’: no waist, no sleeves to fit, no zip…Perfect.
Thanks Cimmie.
Greenie.
Love the wide hem on the sleeves! I have some linen and flour sack cloth that would work well for this. Thx for sharing this idea with us.
Such an easy way of making a top.
All the best,
Greenie.