
Rope bracelet
 |
| Multi-strand rope bangle |
I don’t buy nearly as much as I used to and I use the retail clothing stores and fashion magazines mainly for inspiration. Sometimes it’s a bit hit and miss, making things without a pattern or a guide to work from. This one was really easy.
You need one longish piece of rope or thread for the main section. Some shorter pieces to fit around your wrist. String to tie the shorter pieces together to the longer piece of rope. You will also need glue to secure where you tie the rope together and lastly two beads for each tail end of the bangle.
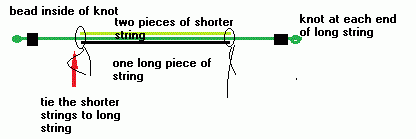 |
| Diagram to make bracelet |
The thread I had in my stash was a bit too thin so I plaited three colours together and I am glad I did that as it gave a variegated effect.
If you look at the diagram, you can see I laid the rope out straight and put the shorter pieces in the middle. I tied them to the longer piece.
Add a bead on each end and tie a nice big knot to stop the bead falling off. Then put a drop of glue at each end where you have tied the ropes together.
Finally I tied a Chinese sliding knot to the the free ends of rope to tie them together. The Chinese knot is not visible in the diagram but you can see it in the photo. You add it last, to the free tails of the bangle when you take the bangle from straight, as in the diagram, to bangle shaped, as in the photograph.
The sliding knot allows you to slide the bangle open and closed again. You may want to have a look at this clip to see how to make a sliding knot. I had to watch it a few times as the kid in the video wiggles the bangle so much, but it’s the best clip I could find. Chinese sliding knot.
To see lots of older and newer tutorials, head back up to the top of the page and visit the Greenie Galleries.
I am back next week with more.
Greenie.